



For a long time, we relied on Google Cloud Functions to pull data from a couple of API's. It worked, but it required maintaining external infrastructure, managing complex authentication, and dealing with the overhead of serverless orchestration. Over a year ago, Fivetran announced a shift in how they support certain cloud function integrations. To stay ahead of the curve and simplify our stack, we decided to migrate our custom integrations to the Fivetran Connector SDK.
The result? A more robust, Python-native connector that works directly within the Fivetran ecosystem. With better debugging, local testing, and easy deployment. Plus, you don't have to explain to your boss why the "serverless" function cost $500 last month because of a recursive loop.
In this tutorial, we'll walk through a simple example: Syncing User from the RandomUserAPI.
What is the Fivetran Connector SDK
The Fivetran Connector SDK is a Python framework for building custom data connectors that run as a native part of Fivetran. You write the extraction logic in Python, and Fivetran hosts the connector, schedules the syncs, and manages the compute for you. There is no third-party function in the middle.
This matters because it removes the operational layer that Function connections forced on you. With Google Cloud Functions you owned the runtime, the deployment, and the failure modes. With the Connector SDK, Fivetran runs your code on its own infrastructure and treats your connector like any other.
Use the Connector SDK when no native Fivetran connector exists for your source, the data sits behind a private or niche API, and you are comfortable writing a bit of Python. If a native connector already covers your source, use that instead. For a wider view of where connectors sit in a modern pipeline, see our primer on the modern data stack.
In the rest of this guide we build a simple connector that syncs users from the free RandomUser API. The users are not real, which makes it a safe playground.
How to get started: a step by step guide
Step 1: Setting Up Your Workspace (The Fast Way)
We start by initializing our project using uv. If you aren’t using uv yet, you’re basically choosing to walk when you could be flying. It ensures our environment is clean and our dependencies are locked. Ensuring if it works for me it also works for you.
Initialize your project
First, create your project directory and let uv handle the heavy lifting:
# Create project and sync dependencies
uv sync
source .venv/bin/activate
Install your dependencies
Your project needs the SDK and requests. You can easily install them with a single command:
# Install needed packages
uv add fivetran-connector-sdk requests
This creates an isolated virtual environment and with these 2 packages installed.
Step 2: Writing the Logic
In connector.py, we define our schema and the update logic. We are going to fetch 100 users from a free api https://randomuser.me/api (don't worry, the users don't actually exist).
The Code:
import requests
from fivetran_connector_sdk import Connector, Operations as op, Logging as log
from fivetran_connector_sdk.helpers import validate_and_load_configuration

def schema(configuration: dict):
    ##
    return [
        {
            "table": "users",
            "primary_key": ["id"],
        },
    ]

def update(configuration: dict, state: dict):
    log.info(f"configuration: {configuration}")
    try:
        user_amount = int(configuration.get("user_amount", 5))
    except (ValueError, TypeError):
        log.warning("Invalid user_amount provided, defaulting to 5")
        user_amount = 5

    log.info(f"Fetching {user_amount} random users...")

    url = f"https://randomuser.me/api/?results={user_amount}"

    try:
        response = requests.get(url)
        if response.status_code != 200:
            log.error(f"Failed to fetch users: {response.status_code}")
            return

        data = response.json()
        users = data.get("results", [])

        for user in users:
            name = user.get("name", {})
            location = user.get("location", {})
            login = user.get("login", {})
            dob = user.get("dob", {})

            user_record = {
                "id": login.get("uuid"),
                "title": name.get("title"),
                "first": name.get("first"),
                "last": name.get("last"),
                "email": user.get("email"),
                "city": location.get("city"),
                "state": location.get("state"),
                "country": location.get("country"),
                "phone": user.get("phone"),
                "cell": user.get("cell"),
                "age": dob.get("age"),
            }

            op.upsert(table="users", data=user_record)
            log.info(f"Upserted user {user_record['first']} {user_record['last']}")

        log.info(f"Fetched {len(users)} users")
    except Exception as e:
        log.error(f"Error fetching users: {str(e)}")

    op.checkpoint(state={})

connector = Connector(update=update, schema=schema)

if __name__ == "__main__":
    connector.debug()
Breaking Down the Complexity
- def schema(): Tells Fivetrans exactly what to expect: in this case, a table called Users. We tell Fivetran exactly what our table looks like. In this case, it’s a Users table with a key ID. We don't need to specify the other columns.
- def update(): This is where the actual logic happens, we:
- Make a request to the api to give us back 100 users.
- Go through each user and extract the data we need.
- Upsert that data to Fivetran table
op.upsert(table="users", data=user_record)
Step 3: Local Debugging: The Game Changer for me
When working with Google Cloud Function, testing required deploying to the cloud and running it. This is time consuming and hard to debug. With the Fivetran SDK, you can simulate a Fivetran sync locally. This is arguably the biggest productivity boost in the whole workflow for me.
Create your configuration
It is possible to give a certain configuration with the connector, This is especially handy if you need to configure runtime values that you don't want to be stored in the script directly. Like API keys or login information In our example we are going to keep it simple and just going to add a variable user_amount that tells the connector how many users he needs to get. First, create a configuration.json file. And add the following json to it:
{
  "user_amount": 5
}
in the code this is accessible
configuration.get("user_amount")
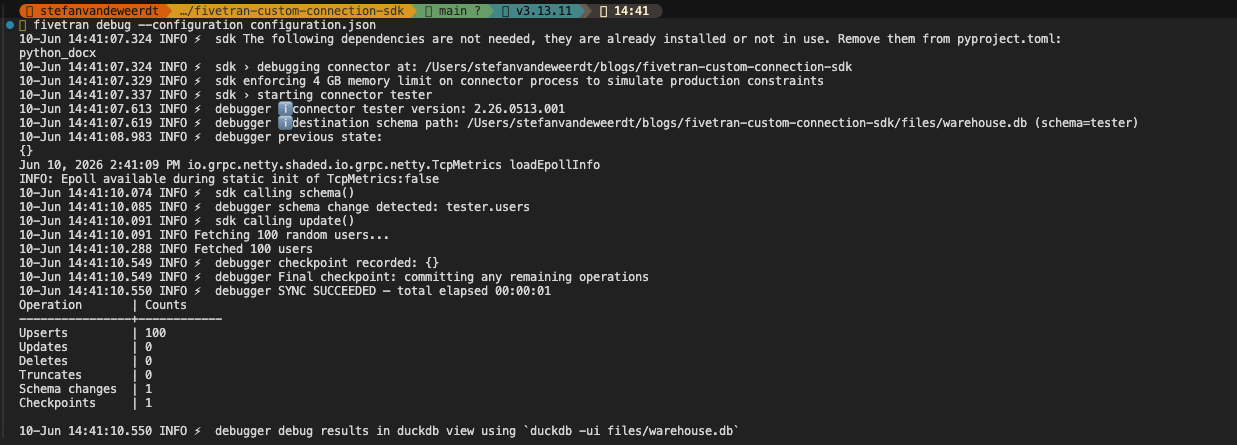
Run the debugger
Then, run the connector directly from your terminal:
python connector.py --configuration configuration.json
This shows you exactly what would be sent to Fivetran without moving a single byte to production. You’ll see logs, upsert operations, and checkpoints happening in real-time. It’s like a rehearsal, but for data.
Step 4: Verification with DuckDB
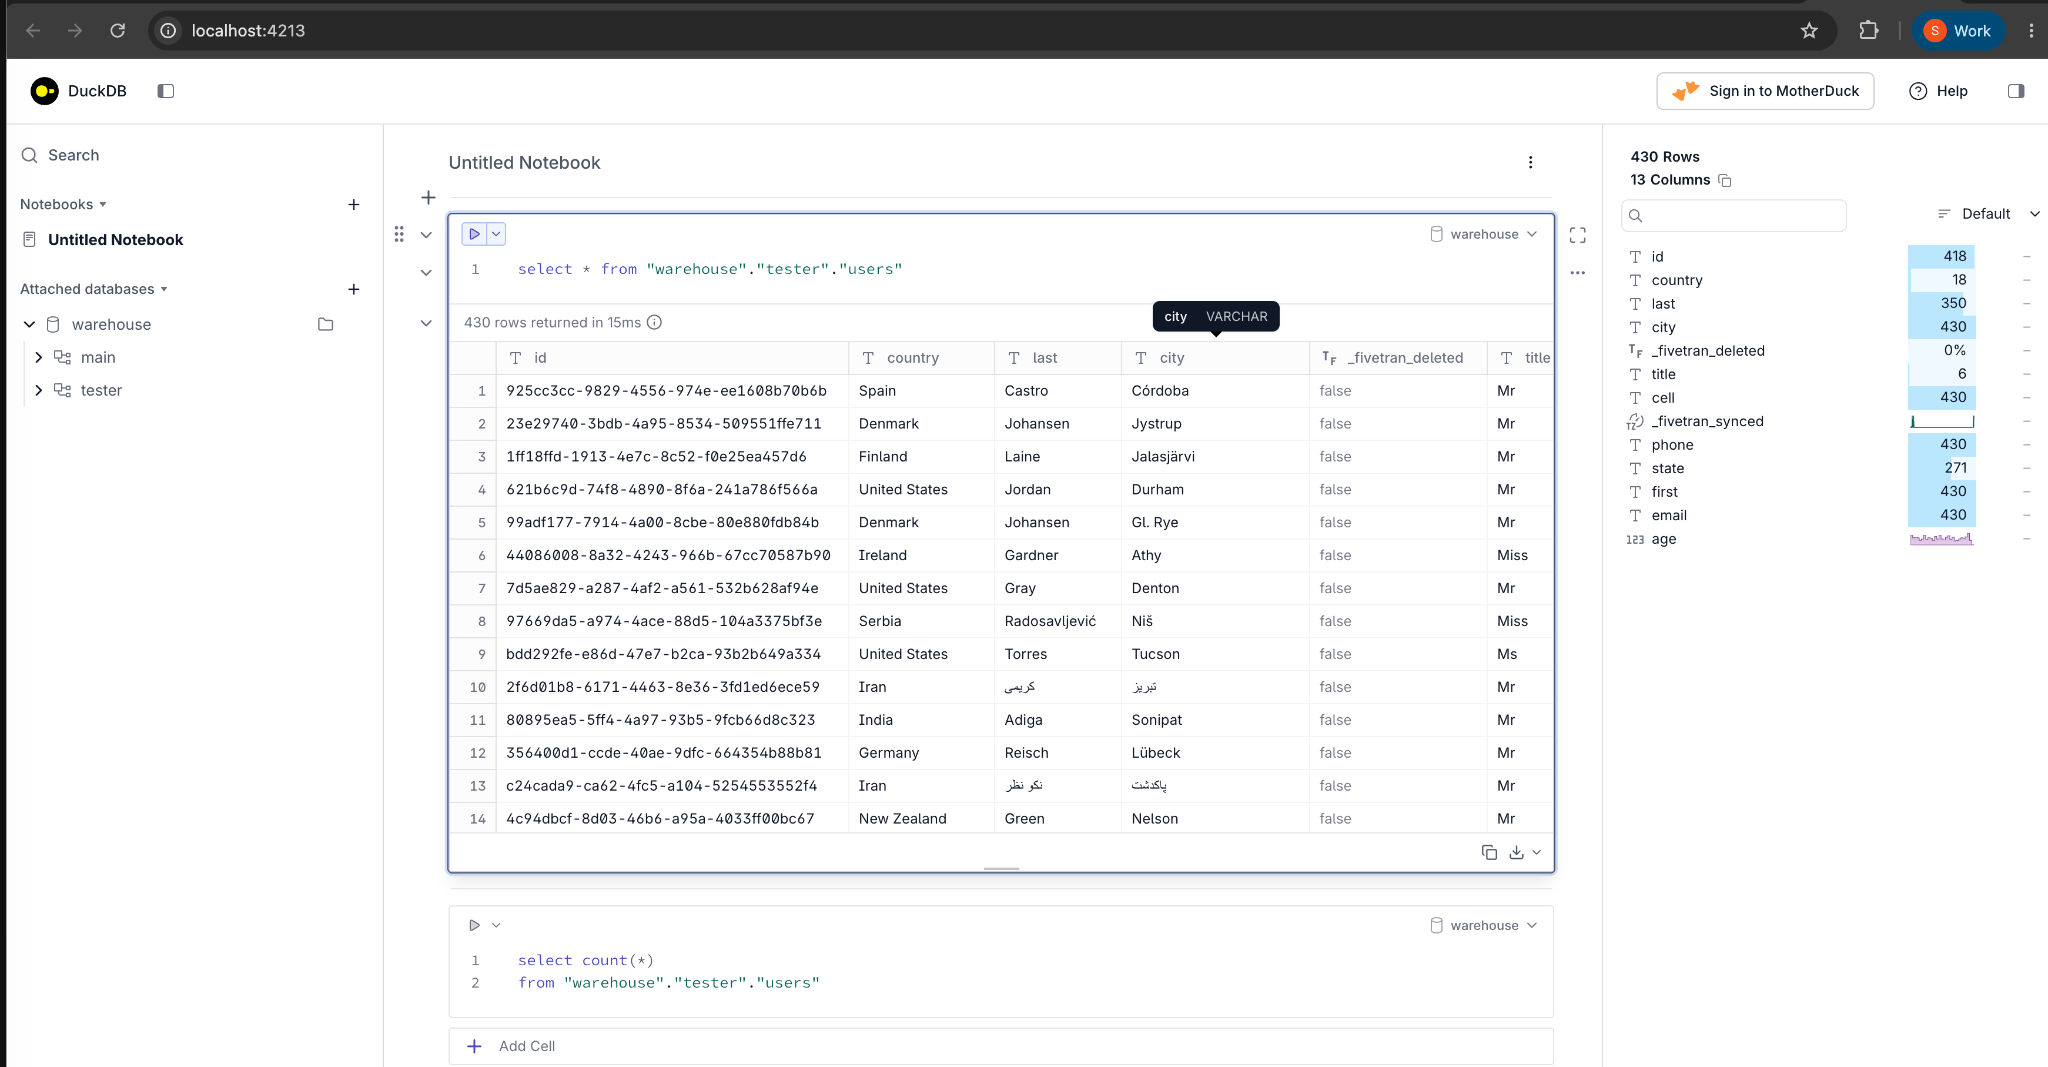
When you debug it writes the data to a local DuckDB file. That they use DuckDB was actually a very nice surprise for me (because I love DuckDB). For those who don't know what DuckDB is, know that it’s an absolute game changer for me! If you want to dive deeper, this is a good starting point. The Fivetran debug option writes the data to a DuckDB file, which you can then analyse using the command below to make sure your data is ok.
Simply run:
duckdb -ui files/warehouse.db
Then run a quick SQL query to see your jokes:
SELECT * FROM users;
Step 5: Deploying to Fivetran
Once you're happy with the results, it’s time to push to production. But to do this, you will need to have a couple of things sorted out beforehand - don't worry, they are easy!
- Find your Destination: Use the Fivetran Dashboard to find the exact name of your destination.
- Gather your API Keys: You'll need your Fivetran API Key and Secret. How to make one is explained on this link https://fivetran.com/docs/connector-sdk/setup-guide#deployyourcustomconnector
fivetran deploy \\
  --api-key "<YOUR-FIVETRAN-API-KEY>" \\
  --destination "<DESTINATION_NAME>" \\
  --connection "joke_sync" \\
  --configuration configuration.json
Conclusion:
Moving from Google Cloud Functions to Fivetran's custom connections has significantly reduced our maintenance burden. No more cloud function maintenance, no more external infrastructure—just clean, Pythonic code that "just works."
If you're still running custom Python scripts in Google Cloud Functions or anything similar, like AWS Lambdas, now is the time to make the switch. It’s easy, it’s powerful, and it gets your data where it needs to be.